


 PCs de escritorio

 Sillas

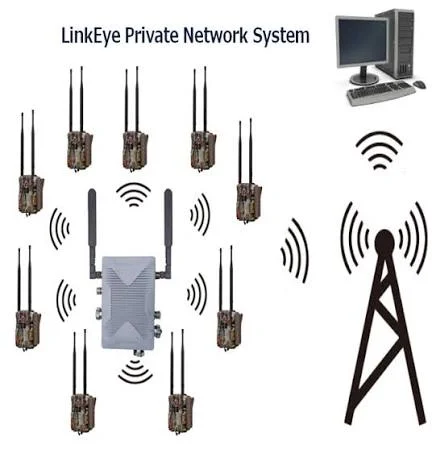
LinkEye RF Camera System Slave Camera
$622.99 + IVA
Disponible pronto
UOVision UMQ2 LinkEye System

Product Usage Instructions
- This LinkEye network device needs to be mounted on a pole or cylindrical object using a double-piece bracket.
- The cylindrical objects should have diameters ranging from 65 mm to 120mm.
- Mount the FRP antennas at the top of the poles for maximum antenna gain.
- The base station should be mounted on the longer part of the bracket to avoid interference.
- Do not power on the device until the antenna connections are finished to prevent device damage.
- Set the correct IP for slave cameras by entering MENU->NET and configuring Camera IP/Station IP/Station password.
- Ensure that the Camera IP has the same gateway as the Station IP.
- If using a CPE (Mobile router) to send data, set the CPE’s gateway to match the base station’s IP.
- Ensure all slave cameras have IPs in the same range.
- After configuring settings, power on the camera to establish a network signal. Manually send a photo/video for testing.
About LinkEye System
Parts
- 1pcs Base Station

- Xpcs Slave cameras

- 2pcs Long antennas

- 2pcs Antenna connection cable

- 1pcs 12V Power cable

- 1pcs Network cable

- 2pcs Steel brackets

Installation
This LinkEye network device needs to be mounted on a pole or a cylindrical object via a double-piece bracket. The diameters ranging of the cylindrical objects can be from 65 mm to 120mm.We recommend mounting on a high elevation with open area. The FRP antennas need to be mounted at the top of the poles as high as possible to maximize the antenna gain.


The installation of the antennas
Screw Installation Diagram

Attentions
The base station needs to be mounted on the longer part of the bracket. Otherwise, there will be interference problem.

Please do not power on until you finish the connection of the antennas. Otherwise, there will be risk to burn the device.
Installing of battery for the camera
Please check if the battery cables are well plugged.
Network settings
The slave cameras need to be set with the correct IP. Enter MENU->NET, to set Camera IP/Station IP/Station pswd. The Camera IP should have the same gateway as the Station IP. For example, if the IP of the base station is 192.168.001.210, then the camera IP should be 192.168.001.xxx. The camera will restart automatically after the new IP is set.
Please input the Station IP and station PSWD as is shown on the base station.
The IP of the CPE
If using a CPE (Mobile router) to send the photos/videos to your FTP or Cloud server, the gateway of the CPE shall be set as the same as the base station. For example, if the IP of a base station is 192.168.8.1, then the IP of the CPE shall be 192.168.8.xxx. The IP of slave cameras shall also be 192.168.8.xxx.
Get the RF signal
- After all the settings are finished, power on the camera and the camera will get the network signal.

Solo los usuarios registrados que hayan comprado este producto pueden hacer una valoración.
RELATED PRODUCTS
Disponible pronto
En stock
Disponible pronto

Disponible pronto

Disponible pronto

Valoraciones
No hay valoraciones aún.